How to Make a Moving Vehicle Objects
Characters driving cars and other vehicles is a common sight in movies nowadays - a reflection of what a common sight it is to see someone driving a car in real life, of course - so it's only natural that you're likely to want to have your characters drive at some point in a Muvizu movie. Although it's not as easy as putting a character inside a car and then making the car move with the character inside, there are a number of techniques to have your story feature scenes in which the character appears to be in a moving vehicle.
---
THE VEHICLE
First of all, you'll need a car (or other appropriate moving vehicle) 3D object asset to import and place your character inside of. If you're a skilled 3D modeler then you could create this object yourself using 3rd party software such as Blender and export to .ASE file format (or also .FBX file format if you have upgraded to Muvizu:Play+), but don't worry if you're not familiar with 3D modeling! A quick search of 3D model libraries such as Trimble 3D Warehouse or even Muvizu.com's own 3D Assets gallery will often turn up a free download of any 3D asset you want!
If you like what you see in the screenshots to follow, you can download the "Sport Car" object used in this Wiki entry HERE: muvizu.com/3D/21882/Sport-Car
And you import the objects into Muvizu using the guidelines in THIS Wiki entry: Importing Custom Objects
---
THE CHARACTER
Once you have your vehicle in the scene, you'll obviously want to create a character ("Create > Characters") if you haven't already done so!
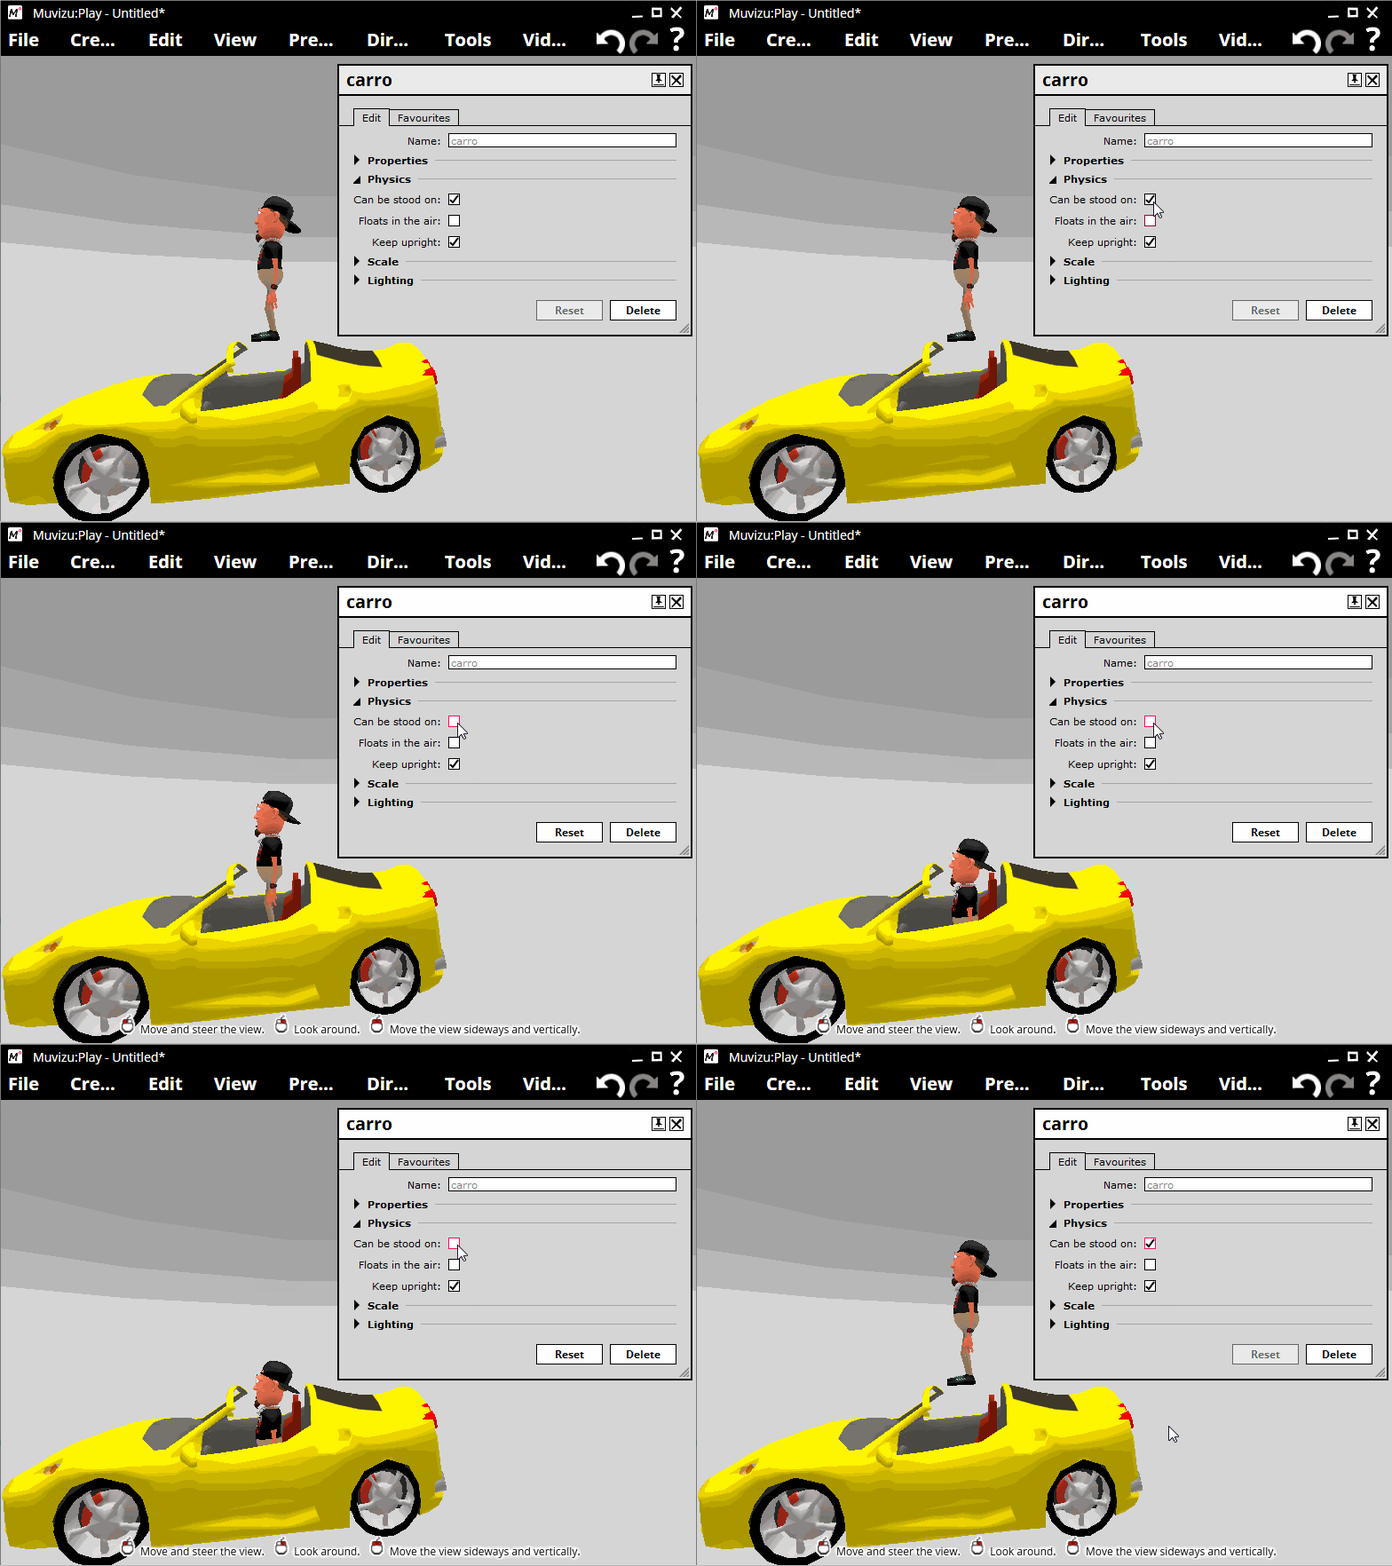
if you want your character to "sit" inside your vehicle object, it's generally going to be a good idea to uncheck the "Can Be Stood On Box" under the "Physics" menu of the object. The difficulty involved in setting up an appropriately-defined collision area shape means that most custom objects just have a "box"-shaped collision area which means you can't actually place the characters "in" the car without coming up against an invisible barrier, so unchecking the "Can Be Stood On" box (as shown below) removes all collision associated with an object and means you should be free to place the character anywhere in or around the object you please:

---
THE "MOVEMENT"
"Movement" will be simulated via a scrolling background in much the same way as in the Flying "Movement" With Superhero Characters tutorial, so feel free to try cross-referencing this section with that article where appropriate.
Create a backdrop ("Create > Objects", then once the "Objects" window open, select the "Backdrops" tab. Pretty much any of the quadrilateral shapes in here would work fine, but I usually choose the "Super-wide" background). Right-click on your backdrop and select "Edit". When the window opens for that backdrop, expand the "Properties" category and click the box next to where it says "Image". Once the "Texture" window opens, select the "Textures" tab and either choose an image from the ones provided with Muvizu or click the "Import" button and bring in your own image - whatever you choose, this image will be what your character "passes by" as he's driving / flying / generally moving on in his vehicle. It's important to make sure that this image can be "tiled" / "repeated", so make sure it's an image of something whole and not just part of something.
Now that you have your background in place, right-click on your backdrop object and select "Edit" again. Once the backdrop window is open again, collapse the "Animation" section and move the "Speed" slider up by dragging it to the right. The image shown on your backdrop should now begin to scroll from right to left (you can click the "Reverse Direction" checkbox if you want it to scroll from left to right)! The faster you want your character's vehicle to appear to be moving, the higher you should set the "Speed" slider.
The above steps, combined with a tight camera shot, should create the impression of the character and the car moving against a stationary background (rather than the opposite, which is what's really happening):

